In the previous tutorial, I explained MVC vs MVVM. We learnt ha every software application has its own ways in which they are designed. MVC simply stands for model view controller and it is one of the commonly used design patterns. In this tutorial, we shall learn how to write a program in JSP while following the MVC pattern.
MVC design pattern is used to separate the application’s concerns i.e. the model and view.
Model – this represents an object carrying data, commonly known as Java POJO. It has logic to update the controller whenever its data values change.
View – this represents the user interface or the visualization of data that models contain.
Controller – this acts as an interface between view and model. It intercepts all incoming requests and controls the data flow into the model and updates the view when data changes. This helps keep the view and model separate.
Read MVC Design Pattern - Java Example here to understand the basics of MVC in Java programming language.
MVC – JSP Example
Let’s now create a real application in the MVC design pattern. In this example, we are using servlet as a controller, jsp as a view component, Java POJO class as a model. In this example, we have created 4 pages:
- Car.java Java Bean that acts as a model.
- CarController.java a servlet that acts as a controller.
- car_details.jsp a page that gets input from the user.
- web.xml file for mapping the servlet.
MVC JSP Project
Step 1: Create a Model
The following is the content of Car.java file:
package car;
public class Car {
    private String make;
    private String model;
    private String color;
    private String reg_no;
    private int year;
    public Car(String make, String model, String color, String reg_no, int year) {
        this.make = make;
        this.model = model;
        this.color = color;
        this.reg_no = reg_no;
        this.year = year;
    }
    public Car() {
    }
    public String getMake() {
        return make;
    }
    public void setMake(String make) {
        this.make = make;
    }
    public String getModel() {
        return model;
    }
    public void setModel(String model) {
        this.model = model;
    }
    public String getColor() {
        return color;
    }
    public void setColor(String color) {
        this.color = color;
    }
    public String getReg_no() {
        return reg_no;
    }
    public void setReg_no(String reg_no) {
        this.reg_no = reg_no;
    }
    public int getYear() {
        return year;
    }
    public void setYear(int year) {
        this.year = year;
    }
    @Override
    public String toString() {
        return "Car{" + "make=" + make + ", model=" + model + ", color=" + color + ", reg_no=" + reg_no + ", year=" + year + '}';
    }

}
Step 2: Create a Controller
The following is the content of CarController.java file:
package car;import java.io.IOException;
import javax.servlet.RequestDispatcher;
import javax.servlet.ServletException;
import javax.servlet.http.HttpServlet;
import javax.servlet.http.HttpServletRequest;
import javax.servlet.http.HttpServletResponse; public class CarController extends HttpServlet { protected void processRequest(HttpServletRequest request, HttpServletResponse response)
throws ServletException, IOException {
response.setContentType("text/html;charset=UTF-8");
Car car = new Car();
car.setMake("Toyota");
car.setModel("Prius");
car.setColor("White");
car.setReg_no("KCP 123D");
car.setYear(2015);
request.setAttribute("car", car); RequestDispatcher rd = request.getRequestDispatcher("car_details.jsp");
rd.forward(request, response);
} @Override
protected void doGet(HttpServletRequest request, HttpServletResponse response)
throws ServletException, IOException {
processRequest(request, response);
} @Override
protected void doPost(HttpServletRequest request, HttpServletResponse response)
throws ServletException, IOException {
processRequest(request, response);
} @Override
public String getServletInfo() {
return "Car details";
} }
Step 3: Create a View
The following is the code for car_details.jsp file:
<%@page import="car.Car"%>
<%@page contentType="text/html" pageEncoding="UTF-8"%>
<%Car car = (Car) request.getAttribute("car");%>

<html>
    <head>
        <meta http-equiv="Content-Type" content="text/html; charset=UTF-8">
        <title>JSP Page</title>
    </head>
    <body>
        <h4>Car Details</h4>
        <ol>
            <li>Make: <b><%= car.getMake()%></b></li>
            <li>Model: <b><%= car.getModel()%></b></li>
            <li>Color: <b><%= car.getColor()%></b></li>
            <li>Reg Number: <b><%= car.getReg_no()%></b></li>
            <li>Rear: <b><%= car.getYear()%></b></li>
        </ol>
    </body>
</html>
Results
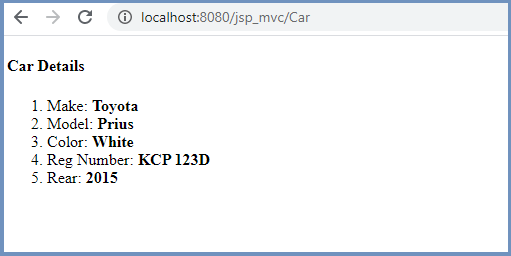
The following is the output after running the program:
Conclusion
Large applications like Facebook and Youtube require MVC pattern. This tells that with MVC skills you will be very marketable in the programming world. You need to follow the best practices of MVC to master the concepts in detail.
You might be interested in knowing what is MVVM (Model View ViewModel) design pattern, this article, MVC vs MVVM has it in details. Kindly read. Also, this article teaches MVC in Java, it is helpful.
Applause for you being so patient and curious! Please share the article with your friends and fellow JSP developers!